
You’re not the first to build an AI agent – and that’s a good thing. Today, some of the world’s most innovative companies are already deploying agents using the Model Context Protocol (MCP) and the Claude MCP server.
Block (formerly Square) built “Goose” on Claude with MCP to handle coding and data tasks. Microsoft embedded the MCP into Copilot and Windows to let agents manage files and systems. OpenAI, Google DeepMind, Replit, Cloudflare, and Allganize are all integrating MCP into their platforms, bringing agents into daily operations, product development, and enterprise workflows.
So what’s stopping you?
If you want to understand how this works under the hood, this article is your step-by-step guide. We’ll walk through exactly how to build your own Claude-powered AI agent using the Claude API, Python, and a Claude MCP server from GitHub.
Here’s what you’ll learn:
- How to connect Claude to your local tools using MCP
- How to securely use credentials and tokens to let your agent schedule calls or manage files
- How to set up and test everything – even if you’ve never coded before
Yes, it may sound challenging, but trust me – it’s not. Everything here is beginner-friendly, and the best part? You can equip yourself with help from other AI systems, such as ChatGPT, Claude, or Gemini, to debug, guide, and configure the setup alongside you.
This tutorial breaks it all down in human language – no jargon, no fluff – and by the end, you’ll have your AI agent live, working, and ready to automate part of your business or life.
Let’s get into it.
Table of Contents
What Is MCP (Model Context Protocol)?
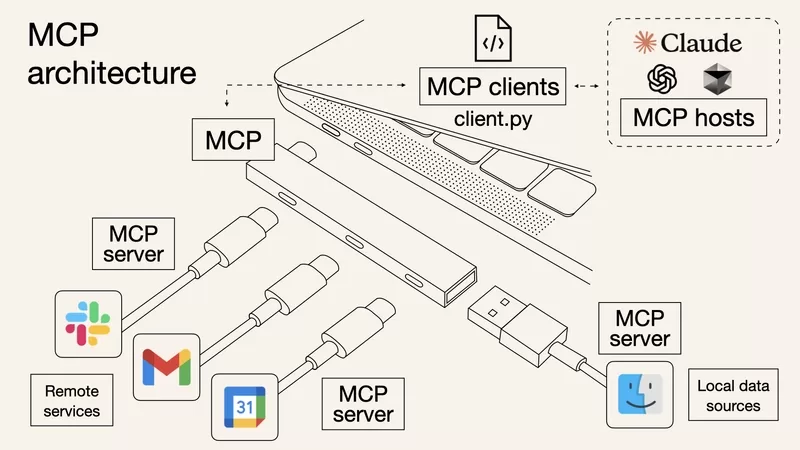
Think of MCP like a translator between your AI and the real world.
Claude is smart, but it can’t click buttons, open calendars, or create meetings by itself. That’s where MCP comes in. It helps Claude talk to other tools like Google Calendar, Notion, or Gmail.
So when you say, “Hey Claude, make a meeting with Alex tomorrow at 3 PM,” Claude uses MCP to understand your request and send it to the right place (like Google Calendar) to get it done.
If you are new to AI agents and AI itself, take a look at the article, which explains AI in detail using Grock LLM. If you consider the economic point of view, the article about which AI companies to invest in is your target.
🤖 Why Use AI MCP?
Because MCP turns Claude into a real helper, not just a chatbot.
Without MCP, Claude can only give advice or write things. With MCP, it can do things like:
- Schedule meetings
- Send emails
- Save tasks in Notion
- Create documents
- Pull data from your tools
It’s like giving your AI arms and legs so it can move around and help you in real life.
That’s why so many companies like Microsoft, OpenAI, and Block are using MCP already. And in this guide, you’ll do the same, with your simple version, step by step.
What You Need To Set Up MCP on Claude
You can find dozens of ready-to-use Claude MCP servers online – just search “Claude MCP server” on GitHub or GitLab. You’ll see open-source agents built for all kinds of use cases: scheduling meetings, writing code, managing files, and more.
Most of these MCP projects come with clear setup instructions in the README. They’ll tell you how to run the server, generate tokens, and link it to your Claude desktop app. But today, instead of just pointing you to another repo, we’re going to build one together.
And don’t worry about getting stuck: I’ll show you how to deal with every common mistake along the way and even how to use other AI tools (like ChatGPT, Claude, or Gemini) to help you debug. You’ll understand exactly how MCP works under the hood and leave this tutorial with a fully working Claude AI agent.
Here’s what you’ll need to get started:
✅ Google Account
To let your agent access Google services, including the Google Calendar API.
✅ Google Calendar API
This API lets your Claude MCP server agent create and manage events. You’ll enable it during the setup process inside Google Cloud Console.
✅ Claude Desktop App
Your main tool for running agents and connecting them to workflows like scheduling, messaging, or task automation.
By using a Claude MCP server, you can unlock even more functionalities for your AI agent.
By leveraging the Claude MCP server, you’ll enhance your AI agent’s capabilities significantly.
✅ Smithery Account
Smithery allows Claude to connect with external APIs and tools via the MCP servers through Claude integration. Sign up for free and get your API key.
✅ Node.js + Python
Node.js powers the MCP server. Python is optional, but useful for scripting or building MCP Python extensions.
The MCP Server for Claude We’ll Use
For this guide, we’ll work with a public Claude MCP GitHub project designed to automate Google Meet scheduling:
👉 Claude Google Meet MCP Server
It supports:
- Claude API integration
- Local server launch via Node
- Token-based authentication with Google
- Full walkthrough via the GitHub README
💡 Other Helpful Resources
- Claude API Docs – for using Claude’s developer features
- Claude GitHub Projects – find more community examples
- Anthropic Claude – Claude’s official homepage
- Cursor – AI-powered coding IDE (great for MCP dev)
- ChatGPT – troubleshoot any step just by pasting error messages or screenshots
- Anthropic on MCP – official explanation of Model Context Protocol
Next up, we’ll walk through the exact steps to set everything up, starting with installing Node and getting your credentials ready. Let’s build your Claude agent together – even if you’ve never built anything like this before.
Step 1: Install Node.js to connect MCP for Claude

To run any MCP server, including the one we’ll use from Claude’s GitHub, you need to have a program called Node.js installed on your computer. Think of Node.js as a small engine that helps your computer understand and run JavaScript code.
Even if you’ve never installed a developer tool before, this step is super easy.
What to Do:
- Go to the official website:
👉 https://nodejs.org - You’ll see two download options. Choose the one labeled “LTS (Recommended for Most Users)”.
✅ It works on both Windows and Mac. - After downloading the file, open it.
- Just click:
Next → Next → Install
You don’t need to change any settings. Just keep clicking Next until you see Install, then let it run. - When it finishes, click Finish.
Download the Claude Desktop App
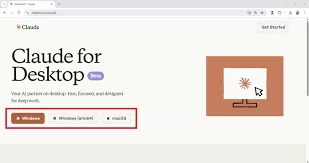
This is your command center – the place where your Claude AI agent will live and run. The Claude desktop app connects to the Claude API, interprets requests, and shows you real-time results. Most Claude for desktop and the Claude code MCP workflows are built around this interface.
- Go to:
👉 https://claude.ai - Sign in or create your Anthropic Claude account if you haven’t already.
- Click on your profile icon (top right corner) and select “Download Claude”. If you don’t see it, scroll down the page – it’s available for both Mac and Windows.
- Download and install the app. It’s lightweight and only takes a few minutes.
This app is the foundation for:
- Running the Claude MCP server commands
- Testing your Claude code directly
- Linking with tools via Smithery
- Integrating workflows from your chosen MCP GitHub repo
- Building Claude MCP GitHub projects from scratch
- Running MCP Python or cursor MCP extensions, if needed
Whether you’re using it to explore AI MCP automation or deploying a full MCP server Claude pipeline, the Claude app is your daily workspace.
Step 2: Install the Google Meet MCP Server Tool
What You’re Doing in This Step:
- Opening a terminal (your computer’s command window)
- Installing the Claude MCP server
- Connecting it to your Smithery account
- Preparing to integrate it with Claude for desktop
First: How to Open the Terminal
The terminal is where we’ll enter commands. Don’t worry – it’s just copy and paste.
👉 On Windows:
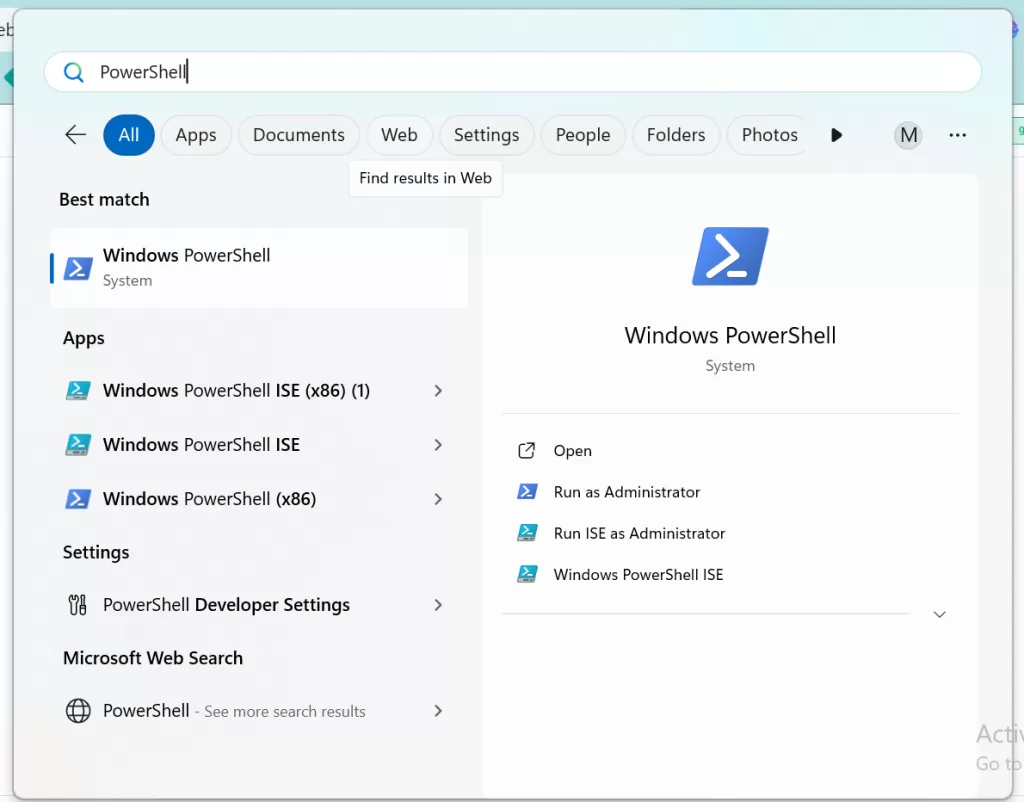
- Press the Windows key on your keyboard.
- Type: PowerShell
- Click on “Windows PowerShell” to open it.
(You’ll see a black or dark blue window pop up—that’s your terminal.)
👉 On Mac:
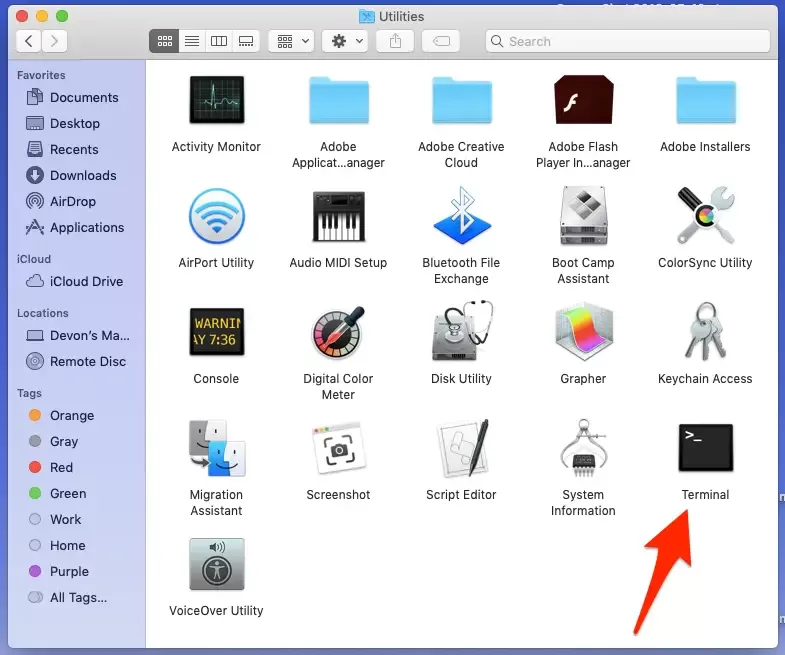
- Press Command + Spacebar to open Spotlight Search.
- Type: Terminal
- Click the Terminal app in the results.
(It will open a white or black window—that’s your terminal.)
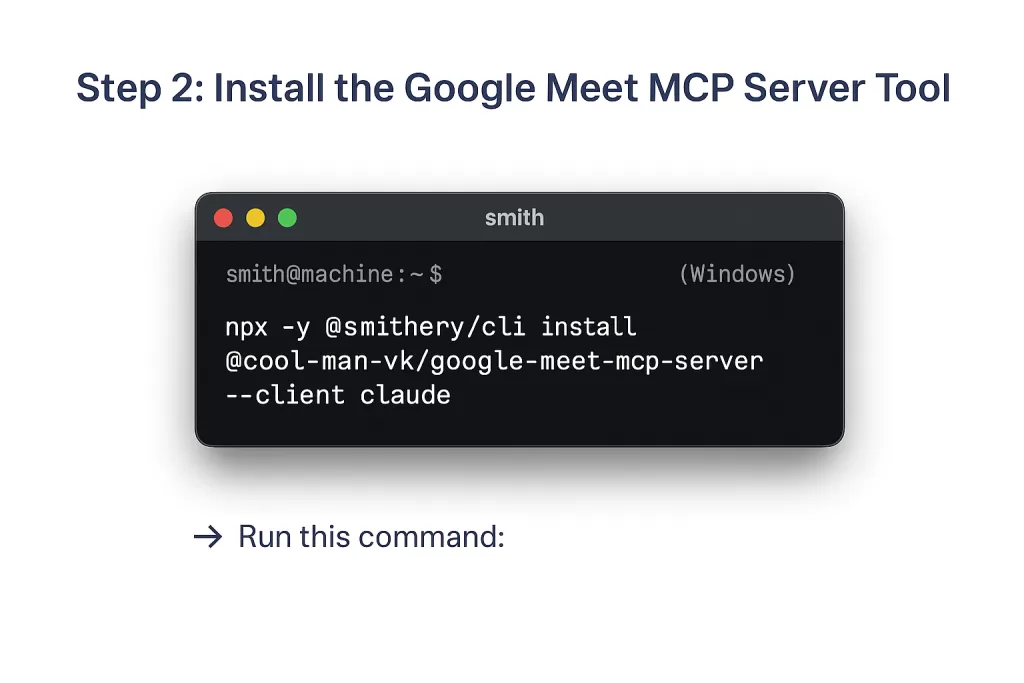
Second: Install the MCP Server Tool

- Now that the terminal is open, copy and paste this command into it:
npx -y @smithery/cli install @cool-man-vk/google-meet-mcp-server – client claude
✅ This command does the following:
- Downloads the Smithery CLI tool
- Installs the Claude MCP server for Google Meet from GitHub
- Connect it to your Claude app setup
Just paste the command, press Enter, and wait. The system will automatically download everything you need.
Third: Enter Your Smithery API Key

Once the install begins, it will ask for your Smithery API key.
To get that:
- Go to https://smithery.ai
- Create a free account if you haven’t already
- Log in, go to your Profile or Settings
- You’ll find your API key – copy it
- Paste it back into the terminal when it asks
This lets the Claude MCP server securely connect to Smithery, which is needed to run commands between your tools and Claude.
Fourth: It Will Ask for These Two Files

After entering your Smithery key, the system will ask for:
- credentials.json
- token.json
At this point, you don’t have them yet, and that’s fine – we’ll create them in the next step.
Here’s what they are for:
| File | What it does |
| credentials.json | Let your agent talk to the Google Calendar API |
| token.json | Links your personal Google account to the agent |
Just let the setup continue – you’ll fill in these files after connecting to Google Cloud Console in Step 3.
💡 What If Something Goes Wrong?

✅ If you get an error message, don’t panic.
Copy the error and paste it into ChatGPT or your Claude desktop app with a prompt like:
“Hey Claude, I’m trying to install a Claude MCP server, and I got this error. What should I do?”
These AI tools can walk you through the solution step by step. Many developers use Claude GitHub or MCP GitHub repos this way when learning.
What You’ve Just Done
You’ve now:
- Opened the terminal (like a real dev 😎)
- Installed the Claude MCP server from GitHub
- Linked it to Smithery
- Prepared the environment for your Claude AI agent
In the next step, you’ll generate the two essential files – credentials.json and token.json – using Google Cloud Console to activate the Google Calendar API.
Let’s move on!
Step 3: Create Google Credentials (credentials.json)

Now that your Claude MCP server is installed, it’s time to give your agent permission to interact with your Google Calendar. To do that, we’ll generate a file called credentials.json.
This file is like a special “key” that lets Claude use the Google Calendar API through your MCP server. Without it, Claude can’t schedule or access your meetings.
Let’s create that file step by step.
🧠 What You’re Doing
- Creating a project in Google Cloud Console
- Enabling the Google Calendar API
- Generating an OAuth client ID for a desktop app
- Downloading the credentials.json file used by your Claude AI agent
Follow These Steps:
1. Visit Google Cloud Console
👉 Go to: https://console.cloud.google.com
Log in with your Google Account.
💡 Use the same account you want your agent to manage meetings for.
2. Create a New Project
Wait a few seconds for the project to be created.
- At the top of the page, click the project dropdown menu (next to the Google Cloud logo)
- Click “New Project.”
- Give it a name like: Claude MCP Project
3. Enable the Google Calendar API
- Make sure your new project is selected (top-left dropdown should say Claude MCP Project)
- In the left-hand menu, go to:
APIs & Services → Library - In the search bar, type:
Google Calendar API - Click the result
- Click the blue “Enable” button
✅ This activates the Calendar API so your Claude MCP server can use it.
4. Create OAuth Credentials
- In the left-hand menu, go to:
APIs & Services → Credentials - Click the blue “+ CREATE CREDENTIALS” button
- Choose “OAuth client ID”
5. Configure the OAuth Consent Screen (first-time only)
If this is your first time creating an OAuth ID, it will ask you to configure the consent screen.
- Choose External and click Create
- Fill in:
- App name: Claude MCP Agent
- User support email: (your Google email)
- Developer contact email: (your Google email again)
- App name: Claude MCP Agent
- Click Save and Continue (you can skip the rest of the sections)
- Finally, click Back to Dashboard
6. Create the Desktop OAuth Client ID
- Now go back to + Create Credentials → OAuth client ID
- In the dropdown, choose “Desktop App”
- Name it: Claude Desktop Agent
- Click Create
✅ You’ll now see a dialog with your client ID and secret.
Click “Download JSON” to save the file.
It will be named something like:
credentials.json
📁 Save the File
Save this file in the same folder where your Claude MCP server is installed. It’s usually in:
C:/Users/YOURNAME/google-meet-mcp-server/
Or on Mac:
/Users/YOURNAME/google-meet-mcp-server/
✅ This credentials.json file will soon be used to generate a token.json file and allow Claude to schedule meetings using your Claude desktop app, Claude API, and Smithery.
🎉 Great work! Your Claude AI agent now has permission to use the Google Calendar API.
In the next step, we’ll launch the server, open a browser, and connect your Google account to generate the second key: token.json.
Let’s move on!
Step 4: Authorize AI Agent (Generate token.json)

Now that you’ve added the credentials.json file to your Claude MCP server folder, it’s time to connect your Google account so your agent can schedule meetings.
This step will generate a second file called token.json.
This file is like a personal pass – it tells Google, “Yes, this user (you!) allowed this AI agent to manage their calendar.”
What You’re Doing in This Step
- Launching the MCP server setup tool
- Opening a Google login window
- Granting permission to use your calendar
- Paste back a verification code
- Creating a secure token.json file for your Claude AI agent
Step-by-Step Instructions:
1. Open Your Terminal Again
If you already have it open from Step 2 – great!
If not:
- On Windows: Press the Windows key, type PowerShell, and press Enter
- On Mac: Press Command + Space, type Terminal, and press Enter
2. Navigate to Your MCP Folder (If Needed)
If you’re not already in the MCP folder, type this command (adjusting YOURNAME):
On Windows:
cd C:\Users\YOURNAME\google-meet-mcp-server
On Mac:
cd /Users/YOURNAME/google-meet-mcp-server
3. Run the Setup Command
Now run this setup command:
npm run setup
✅ This tells the MCP server to read your credentials.json file and begin the authorization process.
4. A Browser Window Will Open Automatically
- You’ll see a message in your terminal saying something like:
“Visit this URL to authorize this application.” - Your default browser will open to a Google login screen.
5. Choose Your Google Account
- Click on the Google account you want your agent to use.
- It will say something like:
“This app is requesting access to your calendar.” - Click Allow or Continue through all the prompts.
6. You’ll Get a Code – Copy It
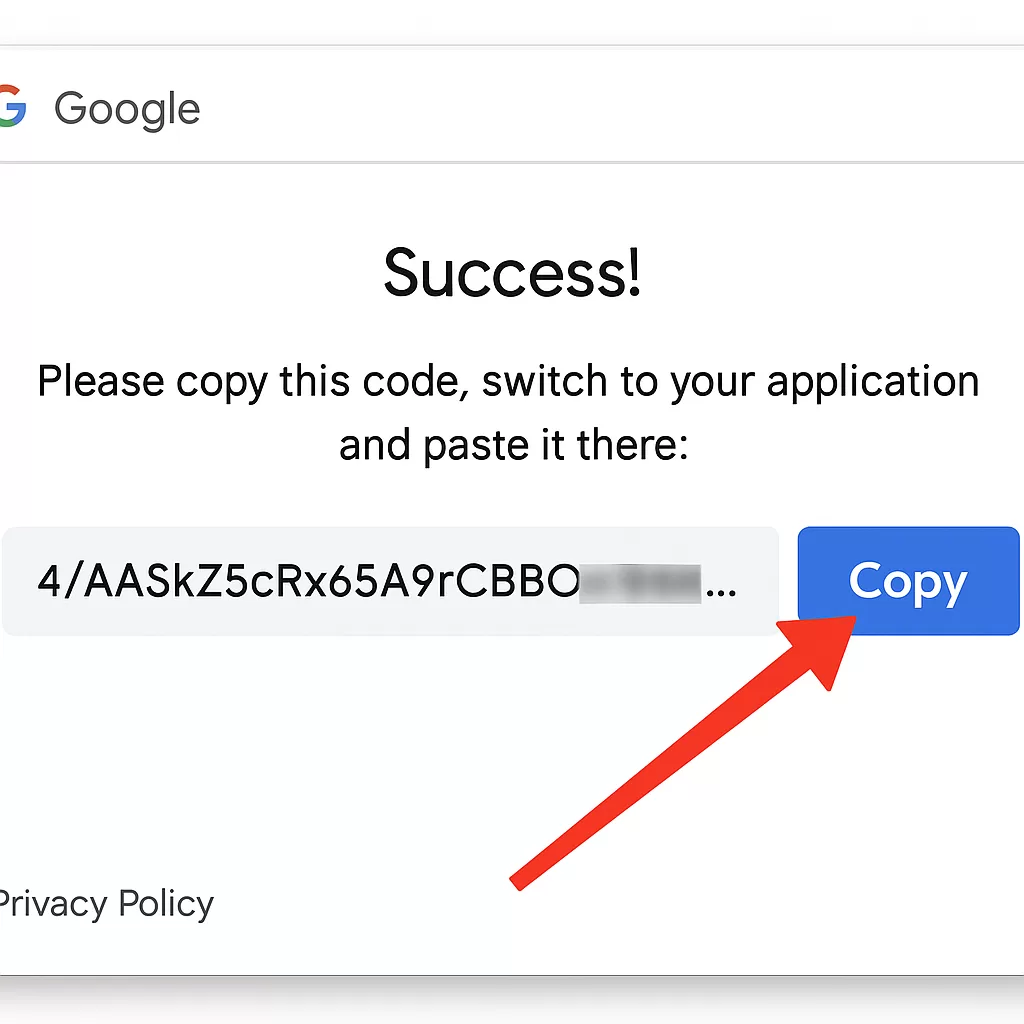
- After you allow access, Google will show a long code on the screen.
- The part after the domain (
anthropic.com) is called the path.- So in this example:
- Domain:
https://docs.anthropic.com - Path:
/claude
- Copy that code
7. Paste the Code into the Terminal
Go back to your terminal.
Enter verification code:
Paste the code you copied and hit Enter.
🎉 Success! What Just Happened:
As soon as you paste the code and press Enter, the MCP server will:
✅ Create a new file in your folder called token.json
✅ Save it in the same location as credentials.json
Now your Claude AI agent is fully authorized to access your Google Calendar using the Claude MCP server and the Claude desktop app.
You’re Now Fully Connected
You’ve completed the Google authorization process, just like major projects in the Claude GitHub and MCP GitHub communities.
In the next step, we’ll connect your Claude desktop app to this local MCP server and test if everything works.
Let’s keep going – you’re almost there!
Step 5: Connect the MCP Server to Claude

Now that your Claude MCP server is installed and authorized with your Google account, it’s time to link it to the Claude desktop app. This is the moment where Claude, your AI agent, and the server you’ve set up will start working together.
By the end of this step, your Claude for desktop app will be able to talk to your local Claude MCP server and execute commands, like scheduling meetings on your calendar, all through natural language.
🧠 What You’re Doing
- Opening the Claude desktop app
- Going to the developer settings
- Adding a new MCP Source (this connects Claude to the server)
- Telling Claude where to find your credentials.json and token.json files
🧭 Step-by-Step Instructions
1. Open the Claude Desktop App
- If it’s not open yet, go to your Downloads or Applications folder
- Look for an app called Claude and double-click it to launch
- You’ll see Claude’s interface, just like a chat screen
2. Go to Settings
- Look at the bottom-left corner of the Claude window
- Click the gear icon ⚙️ labeled “Settings”
3. Open the Developer Tab
- Inside Settings, look at the tabs on the left
- Click on “Developer”
(This is where you can connect Claude to tools like your MCP server)
4. Click “Add MCP Source”
- You’ll see a button labeled “Add MCP Source”
- Click it
(This is where you’ll tell Claude to use your local server.)
5. Fill Out the Required Fields
In the pop-up window:
Command:
node
This tells Claude to use Node.js to run the server.
Arguments:
C:/Users/YOURNAME/google-meet-mcp-server/src/index.js
- Replace YOURNAME with your actual computer username.
On Mac, it might look like:
/Users/YOURNAME/google-meet-mcp-server/src/index.js
6. Add Two Environment Variables
You’ll now tell Claude where to find your credentials and token files.
Click “Add Environment Variable” and do this twice:
- Name:
GOOGLE_MEET_CREDENTIALS_PATH
Value:
C:/Users/YOURNAME/google-meet-mcp-server/credentials.json - Name:
GOOGLE_MEET_TOKEN_PATH
Value:
C:/Users/YOURNAME/google-meet-mcp-server/token.json
(Again, if you’re on Mac, use /Users/YOURNAME/… format.)
7. Save It
- After you’ve filled everything out, click “Save” at the bottom.
8. Check the Status
- After saving, Claude will try to connect to your MCP server.
- If everything is correct, you’ll see a little green dot or the word “Connected.”
🎉 That means your Claude desktop app is now successfully talking to your Claude MCP server!
What This Step Did
You’ve just connected:
- Claude API (inside your desktop app)
- To a real MCP server (running locally with Node)
- That can now interact with tools like the Google Calendar API
This setup is exactly how larger projects work on Claude GitHub and MCP GitHub. And the best part? You did it all without writing code.
Next, we’ll show you how to test the whole thing by sending a simple command—so Claude can create a Google Meet on your calendar.
Let’s go!
Step 6: Make It Run in 1 Click (Optional but Handy)

Right now, you can start your Claude MCP server by opening the terminal and typing commands.
But wouldn’t it be nice to just double-click a file and launch everything automatically?
Let’s make that happen.
🛠️ What You’ll Do:
- Create a shortcut file that starts your Claude MCP server with all the required settings.
- Save time every time you boot up your Claude AI agent.
🧭 Step-by-Step Instructions:
1. Open Notepad on Windows
- Press Windows key + S, type Notepad, and open it
- (Or use any plain text editor)
2. Copy This Code into Notepad:
@echo off
set GOOGLE_MEET_CREDENTIALS_PATH=C:\Users\YOURNAME\google-meet-mcp-server\credentials.json
set GOOGLE_MEET_TOKEN_PATH=C:\Users\YOURNAME\google-meet-mcp-server\token.json
cd C:\Users\YOURNAME\google-meet-mcp-server
npm run start
pause
🔁 Replace YOURNAME with your actual Windows username
You can find your folder name by opening C:\Users in File Explorer
3. Save the File with a .bat Extension
- Click File → Save As
- In “Save as type”, select All Files
- Name it:
start-google-meet-server.bat - Save it on your Desktop or somewhere easy to find
4. Now You Can Just Double-Click!
Every time you want to start your Claude MCP GitHub server:
- Just double-click this .bat file
- A terminal window will open, and your server will launch
This shortcut automatically sets the environment variables, opens your project folder, and runs the npm start command for you.
Step 7: Use Claude to Talk to Your Agent

You’ve set up everything – the Claude app, MCP server, API access, credentials, and token. Now it’s time for the fun part:
💬 Let Claude do something.
💡 Try Saying:
“Create a Google Meet with Alex tomorrow at 3 PM Thailand time.”
Here’s what will happen behind the scenes:
- Your Claude desktop agent understands the command
- It sends a message to the Claude MCP server
- The server connects to the Google Calendar API using your credentials
- A real meeting is created on your calendar – just like that
✅ And it’s all done by your Claude AI agent. For real.
🎉 You Did It!
You’ve just built your AI-powered automation system using:
- Claude for desktop
- Claude API
- Claude MCP server from GitHub
- Google Calendar API
- Smithery integration
- A little help from Node.js and Python
This setup is just like what developers use in real-world Claude GitHub projects and MCP Python agent builders. But you did it from scratch, with zero programming experience.
Next, you can expand your agent to control Notion, Gmail, task managers, or anything else using the different MCP servers Claude supports.
Let’s automate your world, one agent at a time. 🚀
💡 Tips: How to Make Your Claude MCP Server Run Every Time
Once you’ve connected your Claude desktop app to your MCP server, Claude needs that server running in the background to actually execute your commands (like creating meetings).
Here are 3 simple ways to keep it running reliably every time:
✅ Option 1: Just Reload Claude
- When you restart your computer or Claude, it will automatically try to reconnect to the MCP server.
- But for that to work, you need to manually start the server first (see Option 2).
So, before opening Claude, make sure the MCP server is running.
✅ Option 2: Use the .bat File You Created
You already made a file called start-google-meet-server.bat. Here’s how to use it:
- Double-click this file any time you want to run your Claude agent
- It launches the MCP server in a terminal window
- Then you can open the Claude desktop, and the green “Connected” status should appear
📝 You can even add the .bat file to your Startup folder so it runs every time you turn on your computer:
- Press Windows + R → type shell:startup → press Enter
- Copy your .bat file into that folder
Now it will auto-start your Claude MCP server every time you boot your PC. 🎯
✅ Option 3: Use Claude Developer Settings to Reload
If Claude ever shows “Disconnected” after a restart:
- Go to Settings → Developer
- Click the toggle on/off next to your MCP source
- It will try to reconnect to your node server again
You don’t have to reconfigure anything – just give it a nudge.
🧠 Final Reminder
Your Claude AI agent only works while your MCP server is active. Claude connects to it through:
- The command: node
- The file: src/index.js
- Your environment: credentials.json + token.json
Use these tips to keep it running smoothly – and build more AI automations with confidence.
Conclusion: Build Skills, Not Just Shortcuts
In 2025, there will be many companies offering Claude agents and pre-built integrations with your APIs – from dashboards to automation tools, most of them hide the complexity behind sleek UIs. But this guide wasn’t made to sell you shortcuts.
This guide was built so you could understand what’s happening under the hood – to get real with how MCP Claude works, how to launch a Claude MCP server, and how to confidently use Claude desktop MCP workflows in your projects.
If, like me, you’ve ever felt that creeping FOMO – fear of missing the AI wave and getting left behind in a world where machines write code and manage meetings – then learning to set up your own Claude AI MCP server is one of the smartest investments you can make. It’s not just a tech demo – it’s your training for the future.
Whether you’re experimenting with Claude MCP GitHub tools, testing real-world MCP Claude desktop use cases, or diving deeper into Claude AI MCP configurations, remember: this is your playground now.
And if anything breaks – or if you just want help making it work – drop me a message. I’ll walk you through it or help you set up your own MCP server for Claude in minutes.